1. Base script Integration
Gamooga base script Addition is the first step to be taken in order to begin the integration for the website.
Follow the instructions below, to integrate base script into your Website.
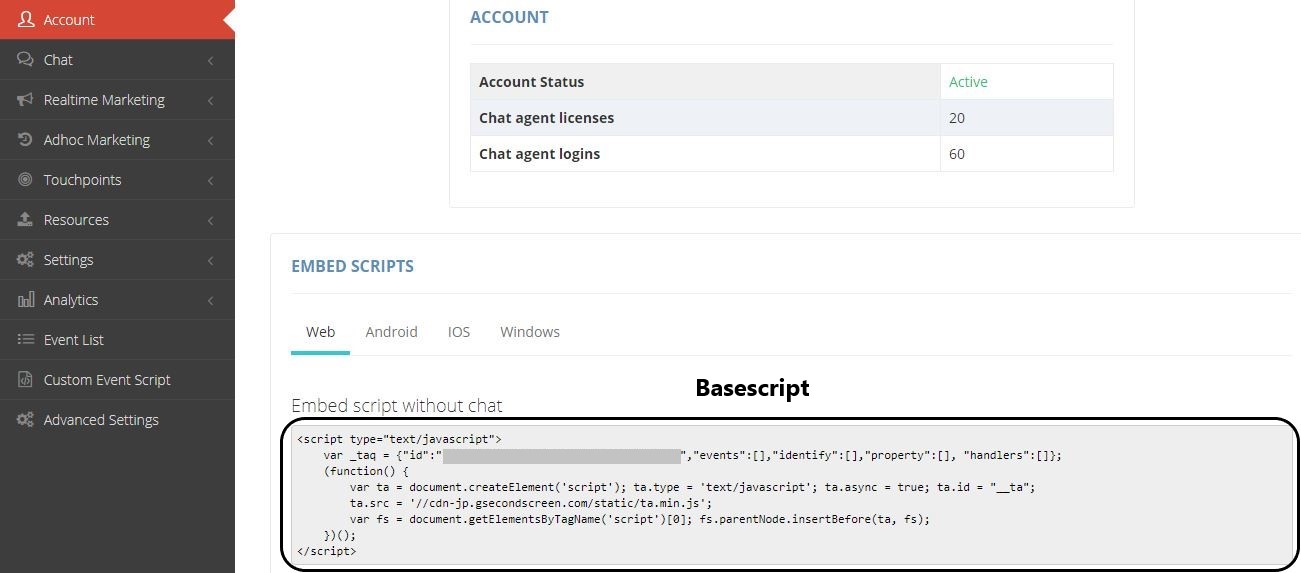
- Login to the Gamooga console.
- Click on Account link in the left panel.
- On the Web tab, copy the script tag provided in the code snippet under “Embed script without chat”
- The script should be preferably placed through a GTM tag named GMG_JS for easy identification and the trigger attached to this tag should be on “Window Loaded”.(Under advanced settings please set “Tag firing options” to “Once per page”)
- If you need to create a new GTM Account, please refer to attached link, also to get a broader idea on tag and trigger creation along with additional information on GTM, please refer to attached link.
2. Web-push Integration
The website should have a GTM container and a firebase account linked to it. The GTM container script should be present on all pages of the website.
2.1 Manifest File Integration
The “manifest.json” is a file that is to be added in the root directory of the domain. This file contains the FCM sender id obtained from the Firebase Account under the “Cloud Messaging” Tab.
2.2 Service Worker Integration
The “sw.js” is a file that has Gamooga’s service worker which links to the company-id which is already linked via the base script integration.
This file is to be also placed in the root directory. The presence of the manifest.json and sw.js files in conjunction is responsible for the collection of webpush tokens via FCM and storing them on the Gamooga database for triggering and rendering web-push notifications for the web-domain.
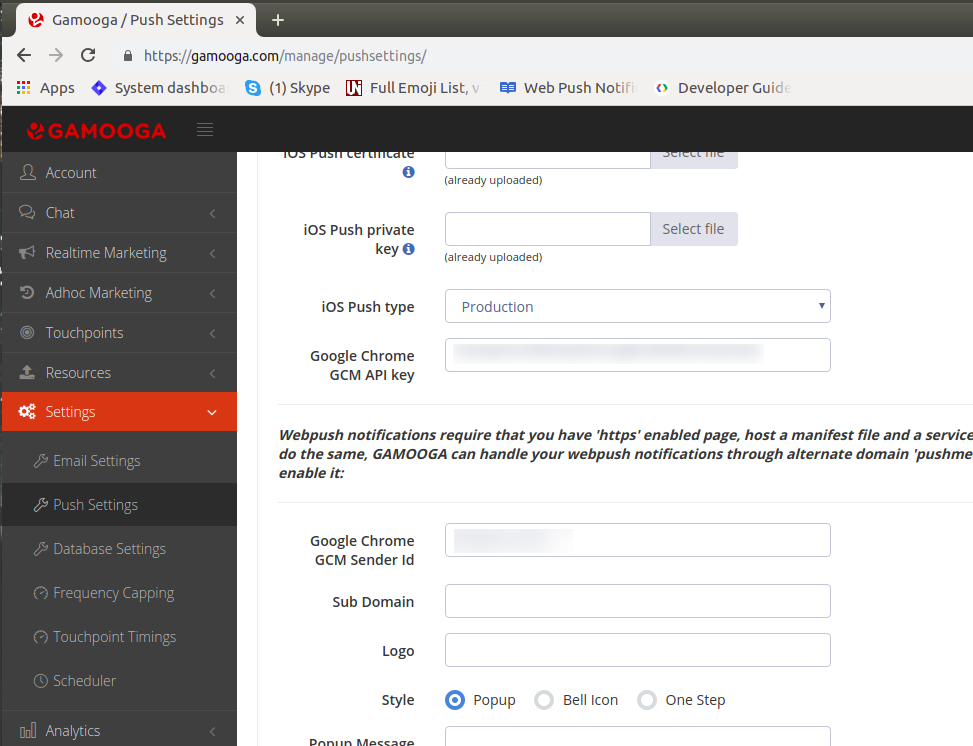
On completion of the above integrations, the FCM sender id and the legacy server key are to be added on the Gamooga panel under “Push Settings”.
Notify the Gamooga team on completion of the above steps, the implementation team will write “Custom Script” on the panel in order to enable Google’s default push permission request across the Web-domain.
To confirm the correctness of the integration, open the statusdash through the Gamooga Panel. The events appearing here are on a real-time basis. The appearance of the below attached events should be observed
started_session : This event fires when a user comes on the site after being inactive for 45 minutes on the Website
visited_page : This event fires whenever a page is loaded on the Website provided that the base script is present on all web-pages associated with the domain.
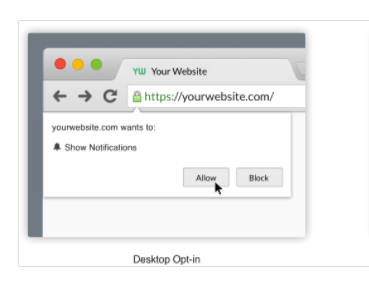
webpush_show : This event fires when a user is prompted with Google’s default push permission request.
webpush_allow : This event fires when a user provides the push permission on the Website.
webpush_block : This event fires when a user clicks on “Block” when prompted with Google’s default push permission request.
webpush_close : This event fires when a users closes the dialogue box when prompted with Google’s default push permission request.
3. Flow of Events
There are two ways for the events to flow from Website to Gamooga’s dashboard. This can be done by integrating EventScript into the website directly or through Google Tag Manager (GTM) by creating tags and triggers.
To send events using JavaScript, refer to the below Code Snippets:
3.1. Events Push
_taq.events.push(['event_name’,
{'property_1':'value_1',
'property_2':'value_2',
'property_3':'value_3'}
]);
Here the parameters are as the following:
- event_name: Name of the Event that is being pushed.
- Property: Property specific to the event
- Value: Value of the property specified
There are no limitations on the number of properties that can be sent.
Note: Events such as login and sign up are to be fired after identification call is complete( this is done in order to have the event fire with the mapped visitor id ). Also please make sure there should be no space in event names and property names.
3.2. Identification Call
Gamooga provides a visitorID for every user. After a successful login/signup the user is assigned a unique ID from the client. The mapping of the unique ID to Gamooga’s visitor ID is done with the help of the identification call.
Flow
-> User logs in/signs up on the website
-> Identify method to be called
-> Login/Signup event is pushed
The below code demonstrates on how to add the identification call followed by a visitor property push of the unique ID.
_taq.handlers.push(['ready',function(){
var mobile=’9876543210’;
_taq.identify.push([mobile,function(){
_taq.property.push(['mobile',mobile]);
}]);
}]);
Handlers push - This function makes sure that all library files of Gamooga are loaded and then the script inside the function will be executed.
Note: To identify the user with the unique ID, a set of steps are to be followed as mentioned, i.e. Firstly, handlers push is to be called, followed by the identification call that assigns the visitor ID to the mapped unique ID. On completion of the above two steps, the event push or the property push can be done to pass events of properties with the identified visitor ID.
3.3. Visitor Properties Push
Visitor Properties are pushed to Gamooga in order to have a similar track of a user profile or user attributes after the login/signup is complete. The below method is preferably called to pass the necessary user attributes when the user has successfully logged in or signed up with the client and has been identified with the help of the above Identification call.
_taq.property.push([‘property_name',’property_value’]);
Example: _taq.property.push(['mobile','9059714566']);
4. Google Tag Manager (GTM)
Follow the instructions below to send events through Google Tag Manager.
- Login to your Google Tag Manager account.
- The account
implementation@gamooga.comis to be provided access to the container in order to demonstrate on the tags and triggers addition for the GTM container.
GTM sends the events to the Gamooga database in real time. These tags can be written in two ways:
-
Pushing the data to Data Layer and firing Gamooga tags based on the Data Layer.
This is the preferred way, as this is independent of the elements in the website.Passing data to GTM DataLayer:
Syntax:
dataLayer.push({‘event’:’event_name’,’key1’:’value1’,’key2’:’value2’,’key3’:’value3’….})
For Example:
dataLayer.push({‘event’:’login’,’name’:’Gamooga’,’mobile’:’9999999999’,’email’:’info@gamooga.com’….}) –> You can add multiple “key” “value” parameters.
:- “event_name”- Name of the Event that is being pushed.
:- “key”- Property specific to the event.
:- “value”- Value of the property specified.
Note: Please make sure that there should be no space in event names and event property names and these are in lowercase.
-
Fetching the data from UI: Inspecting the class, ID of the elements from the website and fetching data from those elements.
This is not a recommended way as the names of class and ID change very often, due to which the required data can’t be retrieved easily.
5. Mobile Website
A mobile site is a version of the web, that is molded to work better on a mobile device. So, the integration process of a regular website will be the same for mobile site integration.