1. TargetActClient Framework file
- Refer to the below link in case it is required to install cocoa pods. https://cocoapods.org
- Open the terminal and head to your project directory. Run pod init command to create Podfile.
- Open podfile and paste the below line of code in your podfile.
pod 'TargetActClient', :git => 'https://gitlab.com/gamooga-ios/TargetActClientFramework.git' - Open terminal and run the command pod install.
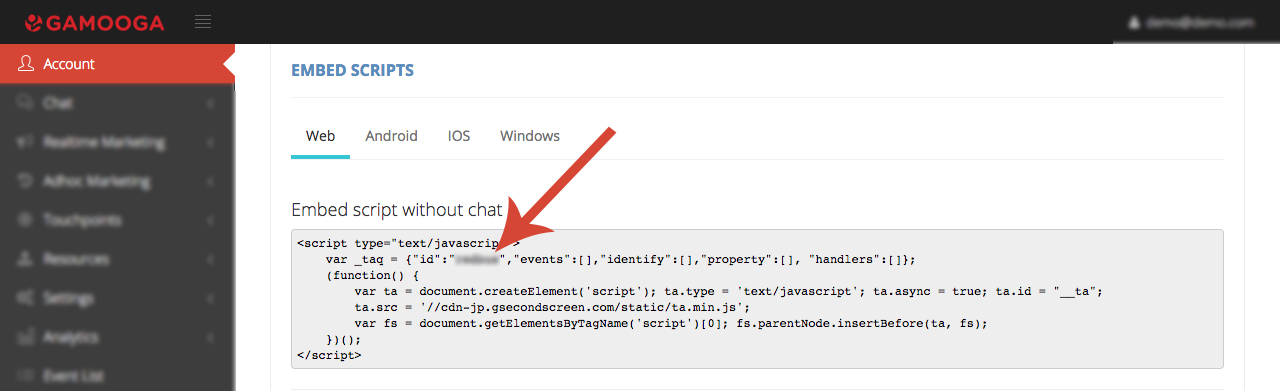
2. How to find Gamooga Company ID
- Login to the Gamooga console.
- Click on Account link in the left panel.
- In the Web tab, you can find the company id, in the script to embed.
3. Changes to Info.plist file
<key>GamoogaCompanyId</key>
<string>GAMOOGA_COMPANY_ID</string>
3.1. Carousel Notifications – Action Titles
To provide the default names for the two action titles for carousel notifications, the values are to be added for the below keys provided in the code snippet.
<key>GamoogaNotificationActionTitle1</key>
<string>title1</string>
<key>GamoogaNotificationActionTitle2</key>
<string>title2</string>
3.2. Mobile Notifications Persistance
On closing an in-app notification, a persistent image can be displayed. Until it is swiped down to remove the floating image. Till the time the persistent image is there, it can always be clicked to view the in-app notification on multiple occasions. To change the images of persistent image, replace the image names.
<key>STRIP_IN_APP</key>
<string>image1</string>
<key>IMAGE_IN_APP</key>
<string>image2</string>
<key>TEXT_IN_APP</key>
<string>image3</string>
<key>TEXT_IMAGE_IN_APP</key>
<string>image4</string>
<key>FULL_IMAGE_IN_APP</key>
<string>image5</string>
3.3 Debugging
The following is to be used to enable logs(This is recommended to be a part of the Development build only and not on the Production build). Any number less than or equal to 30 can be utilized.
<key>GamoogaLogLevel</key>
<number>30</number>
4. Generating Push Certificates
4.1. Generating SSL Certificate for APP ID
- Log in to the iOS Dev Center and select the Certificates, Identifiers, and Profiles
- Go to App IDs in the Identifiers Section of the sidebar and select your app. If it has automatically created, Skip to Step 6.
- To create new App, click + and fill the details for App ID, App Services (Check the push notification Checkbox) and Explicit App ID(Should be same as Bundle ID in your App)
- You will be asked to verify the details of the app id. Verify and click on Register.
- In the Push Notification row, find two orange lights that say “Configurable” in the Development and Distribution column.
- Select your App ID and click on EDIT.
- If Push Notification is not enabled, enable it to make it configurable.
- Select Create Certificate in the Development/Production SSL Certificate
- In the next step, it will ask you for generating a CSR
4.2. Generating the Certificate Signing Request
- Open Keychain Access on your Mac and choose the menu option Certificate Assistant -> Request a Certificate from a certificate authority
- Enter a descriptive name for Common Name (Preferably, give the name appended by Gamooga to identify it)
- Check Save to disk option and click continue.
- In the Keys section of the Keychain Access, a new private key will appear with a Common name specified.
- Choose the CSR that you generated to create the push certificate
- Click Continue and download the certificate
- Double click on the downloaded certificate. This will add your certificate to your private key in your keychain
- Go to Keys section in the Keychain and find your private key
- You should be able to expand the private key and find your certificate with it. Select both- the private key and the certificate after expanding (as shown in the snapshot).
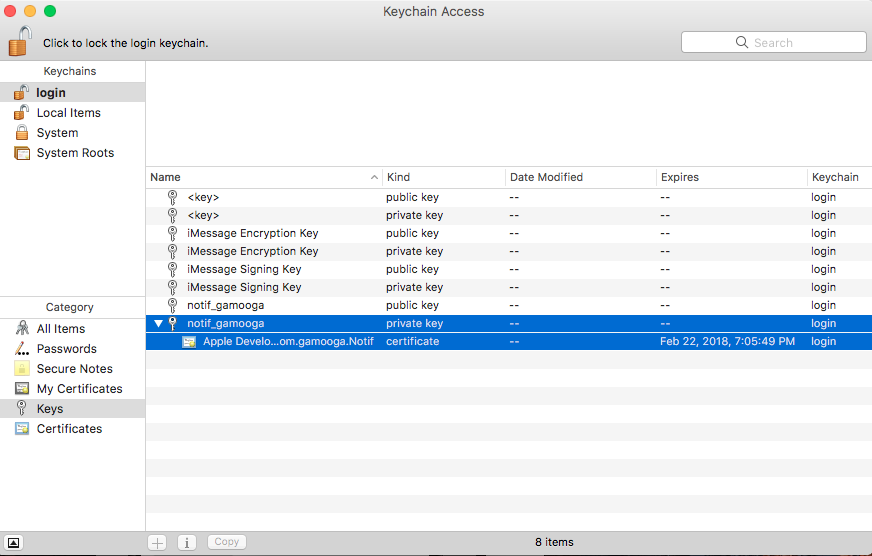
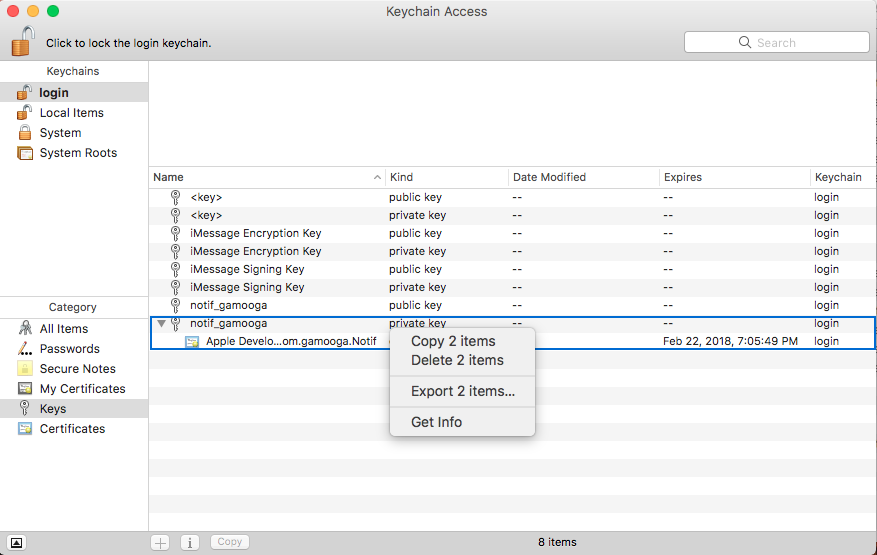
- Right click on it to export it as .p12 file. Make sure you are exporting two items as shown.
- Name your file as your_app_name and save it with file format .p12
- You will be prompted to enter a password. Click “Ok” to save without any password.
- In the next step, you will require your system password to finally save the file.
4.3. Creating a pem file from the p12 file
- Create Certificate .pem from Certificate .p12
openssl pkcs12 -clcerts -nokeys -out your_app_name_cert.pem -in your_app_name.p12 - Create Key .pem from Key .p12
openssl pkcs12 -nocerts -out your_app_name_key.pem -in your_app_name.p12 - This step is mandatory to remove the encryption of your key.
openssl rsa -in your_app_name_key.pem -out your_app_name_key_noenc.pem - Check certificate validity and connectivity to APNS
openssl s_client -connect gateway.sandbox.push.apple.com:2195 -cert your_app_name_cert.pem -key your_app_name_key_noenc.pem
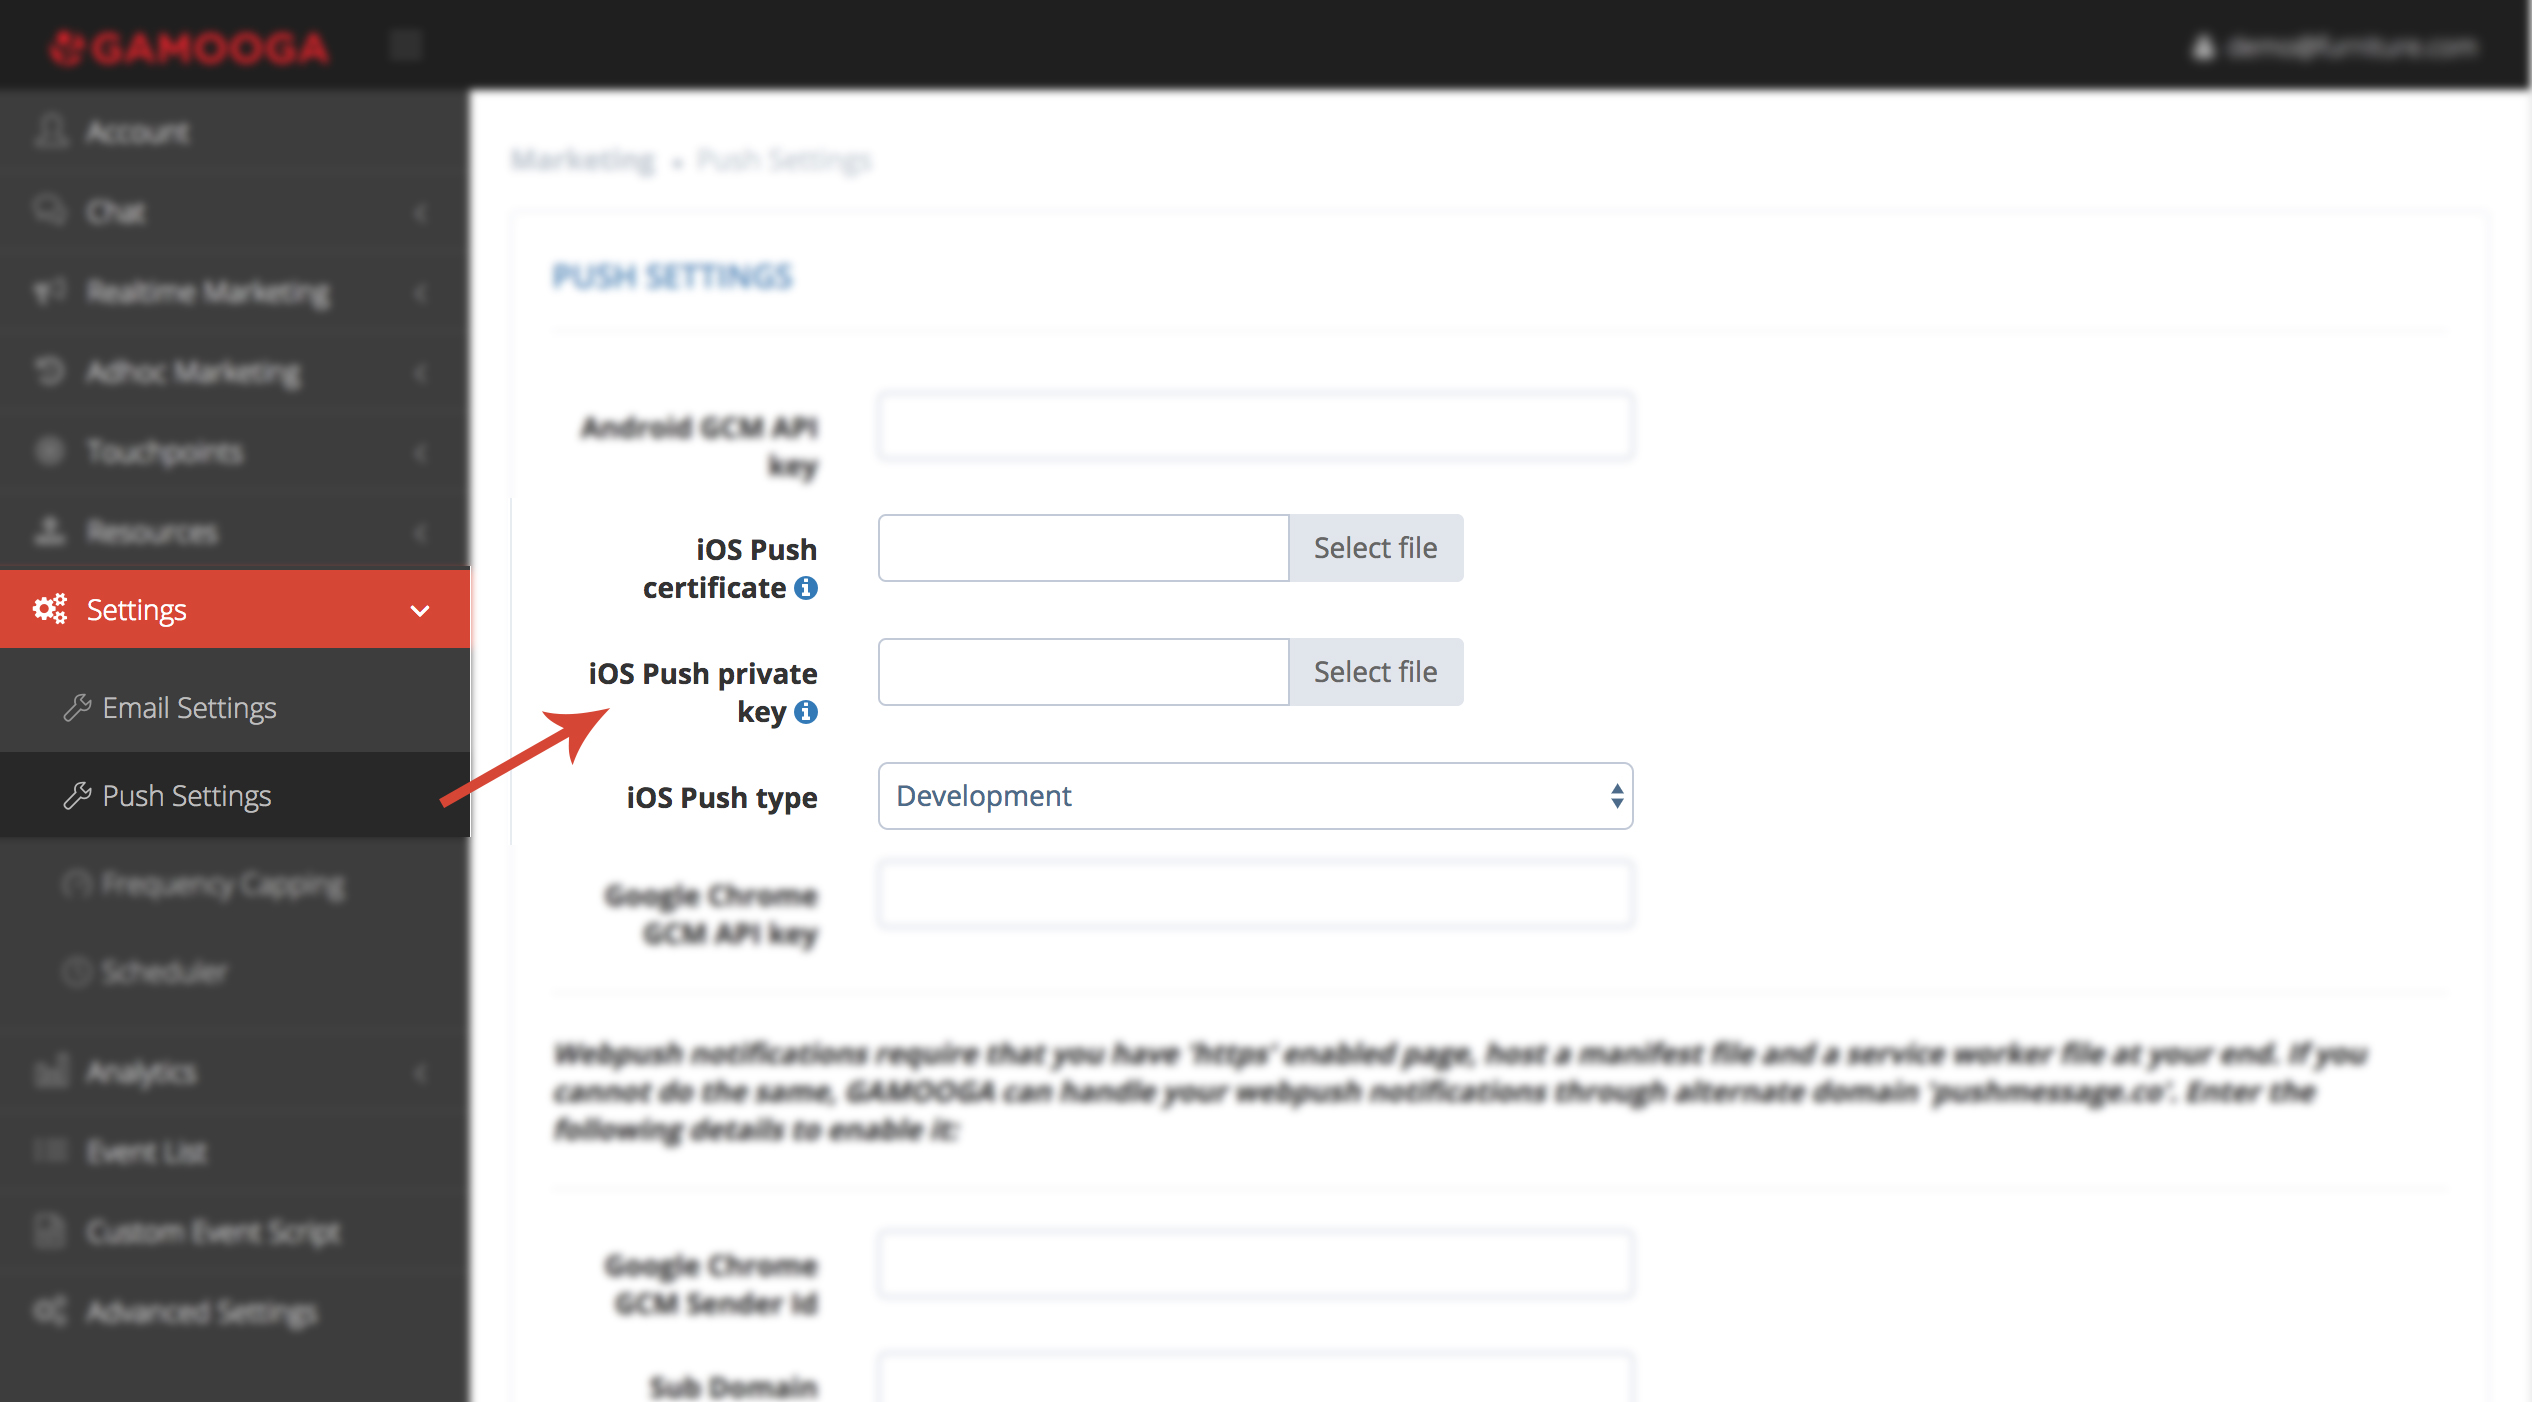
5. Upload Push Certificates
- In the Gamooga admin panel, navigate to the page “Push Settings” under settings.
- Upload your push certificate (your_app_name_cert.pem) and push key with encryption(your_app_name_key_noenc.pem or your_app_name_key.pem if not encrypted)
-
Change the push type dropdown to development/production based on the certificate type.
Note: When done with development and ready for production, you need to follow the above process to generate production certificates and re-upload them to our console. Also, please remember to change the Push type dropdown accordingly.
6. Integration on iOS Versions
6.1. Integration into swift projects
Objective-C and Swift files can coexist in a single project, whether the project was originally an Objective-C or Swift project. Steps to follow to integrate Gamooga SDK in your swift projects.
You can import framework using import TargetActClient, or you can import it in bridging header file. Follow below steps to create bridging header file.
- Create a new Objective C file in your project (File->New->File [Objective C for iOS]).
- Accept the prompt (agree) to create a bridging header file between Objective C and Swift.
- Delete your newly created Objective C file but retain the bridging header file ${YOURPROJ}-Bridging-Header.h.
- In the Bridging header file, import our framework using the standard Objective C import syntax (e.g. #import “TargetActClient/TargetActClient.h”).
For more detailed information refer to Apple’s docs using this link
6.2. Integration for iOS 10 and above
6.2.1. Changes in capabilities
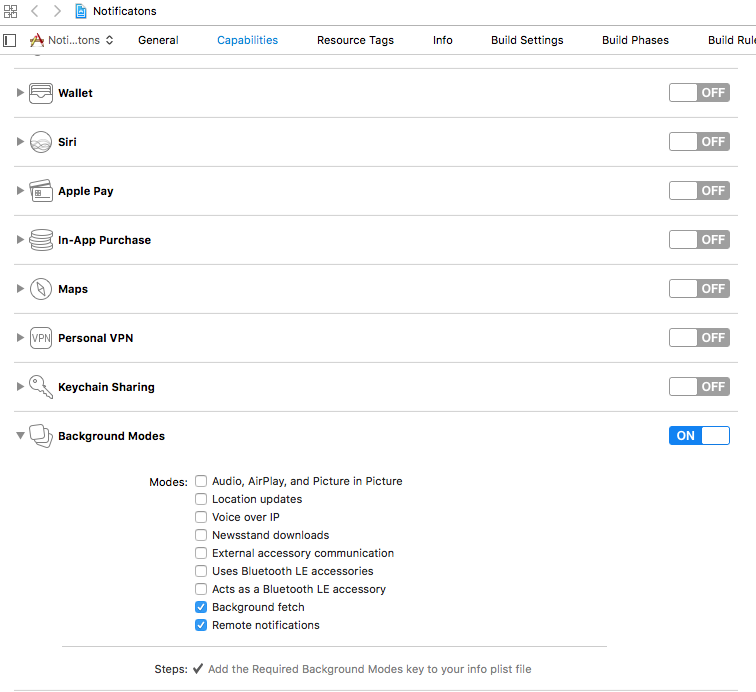
There are new delegate methods introduced in iOS 10 to track notifications and display in the foreground state as well. To track notifications in the background state, you need to enable background mode in the capabilities. Above all of these, you need to activate push notification in the capabilities. This will add entitlement files to your app target.
6.2.2. AppDelegate Changes
a. Import Framework
- In Objective C
#import <UserNotifications/UserNotifications.h> #import "TargetActClient/TargetActClient.h" - In Swift
import UserNotifications
import TargetActClient
b. Registering for push notifications
- In Objective C
- (BOOL)application:(UIApplication *)application didFinishLaunchingWithOptions:(NSDictionary *)launchOptions { TargetActClient *tc = [TargetActClient sharedInstance];//WithServer:@"192.168.1.4:10000"]; tc.target = self; UNUserNotificationCenter *center = [UNUserNotificationCenter currentNotificationCenter]; center.delegate = self; [tc doPushRegistration]; [tc initializeCarouselActions]; return YES; } - In Swift
func application(_ application: UIApplication, didFinishLaunchingWithOptions launchOptions: [UIApplication.LaunchOptionsKey: Any]?) -> Bool
 {
     let target = TargetActClient.sharedInstance() as TargetActClient
     target.target=self

     target.doPushRegistration()
     target.initializeCarouselActions()
     let center = UNUserNotificationCenter.current()
     center.delegate = self;
     return true
 }
c. Sending the push token to Gamooga servers
- In Objective C
-(void)application:(UIApplication *)application didRegisterForRemoteNotificationsWithDeviceToken:(NSData *)deviceToken { TargetActClient *tc = [TargetActClient sharedInstance]; [tc updatePushRegistrationId:deviceToken]; } - In Swift
func application(_ application: UIApplication, didRegisterForRemoteNotificationsWithDeviceToken deviceToken: Data)
 {
     let tc = TargetActClient.sharedInstance() as TargetActClient
     tc.updatePushRegistrationId(deviceToken)
 }
d. Handling Push Notifications
Notifications are delivered while the app is in the foreground, background or not running state. We can handle them in the following delegate methods.
The method will be called on the delegate only if the application is in the foreground. If the method is not implemented or the handler is not called in a timely manner, then the notification will not be presented. The application can choose to have the notification presented as a sound, badge, alert and/or on the notification list. This decision should be based on whether the information in the notification is visible to the user.
- In Objective C
- (void)userNotificationCenter:(UNUserNotificationCenter *)center willPresentNotification:(UNNotification *)notification withCompletionHandler:(void (^)(UNNotificationPresentationOptions))completionHandler { NSDictionary *userInfo = notification.request.content.userInfo; if([notification.request.trigger isKindOfClass:[UNPushNotificationTrigger class]]) { NSLog(@"%@", userInfo); } completionHandler(UNNotificationPresentationOptionAlert); } - In Swift
func userNotificationCenter(_ center: UNUserNotificationCenter, willPresent notification: UNNotification, withCompletionHandler completionHandler: @escaping (UNNotificationPresentationOptions) -> Void)
 {
     let userInfo = notification.request.content.userInfo
     if (notification.request.trigger is UNPushNotificationTrigger)
     {
         print("\(userInfo)")
     }
     completionHandler(.alert)
 }
The method will be called on the delegate when the user responded to the notification by opening the application, dismissing the notification or choosing a UNNotificationAction. The delegate must be set before the application returns from applicationDidFinishLaunching: NOTE: This method is specifically required for carousel and slider push to work.
- In Objective C
- (void)userNotificationCenter:(UNUserNotificationCenter *)center didReceiveNotificationResponse:(UNNotificationResponse *)response withCompletionHandler:(void (^)())completionHandler { NSDictionary *userInfo = response.notification.request.content.userInfo; if([response.notification.request.trigger isKindOfClass:[UNPushNotificationTrigger class]]) { NSLog(@"%@", userInfo); NSLog(@"%@", response.actionIdentifier); } completionHandler(); } - In Swift
func userNotificationCenter(_ center: UNUserNotificationCenter, didReceive response: UNNotificationResponse, withCompletionHandler completionHandler: @escaping () -> Void)
{
     let userInfo = response.notification.request.content.userInfo
     if (response.notification.request.trigger is UNPushNotificationTrigger)
     {
         print("\(userInfo)")
         print("\(response.actionIdentifier)")
     }
}
e. Handling Deeplinks
For Push notifications, deep links should be handled in the method didReceiveNotificationResponse:withCompletionHandler: as described below. You can get the deep link URL and then pass it to openUrl: and then you should get a callback in the application:openUrl: options where you can handle the opening of a specific page.
- In Objective C
- (void)userNotificationCenter:(UNUserNotificationCenter *)center didReceiveNotificationResponse:(UNNotificationResponse *)response withCompletionHandler:(void(^)())completionHandler { NSDictionary *userInfo = response.notification.request.content.userInfo; if ([userInfo objectForKey:@"deeplinkurl"]) { NSURL *url = [NSURL URLWithString:userInfo[@"deeplinkurl"]]; dispatch_async(dispatch_get_main_queue(), ^{ [[UIApplication sharedApplication] openURL:url]; }); } completionHandler(); } - In Swift
func userNotificationCenter(_ center: UNUserNotificationCenter, didReceive response: UNNotificationResponse, withCompletionHandler completionHandler: @escaping () -> Void)
{
   if userInfo["deeplinkurl"] != nil {
         let url = URL(string: userInfo["deeplinkurl"] as! String)
         DispatchQueue.main.async(execute: {
             if let url = url {
                 if #available(iOS 10.0, *) {
                     UIApplication.shared.open(url, options: [:], completionHandler: nil)
                 } else {
                     UIApplication.shared.openURL(url)
                 }
             }
         })
   }
}
6.3. Integration for iOS 9 and below
6.3.1. Changes in Capabilities
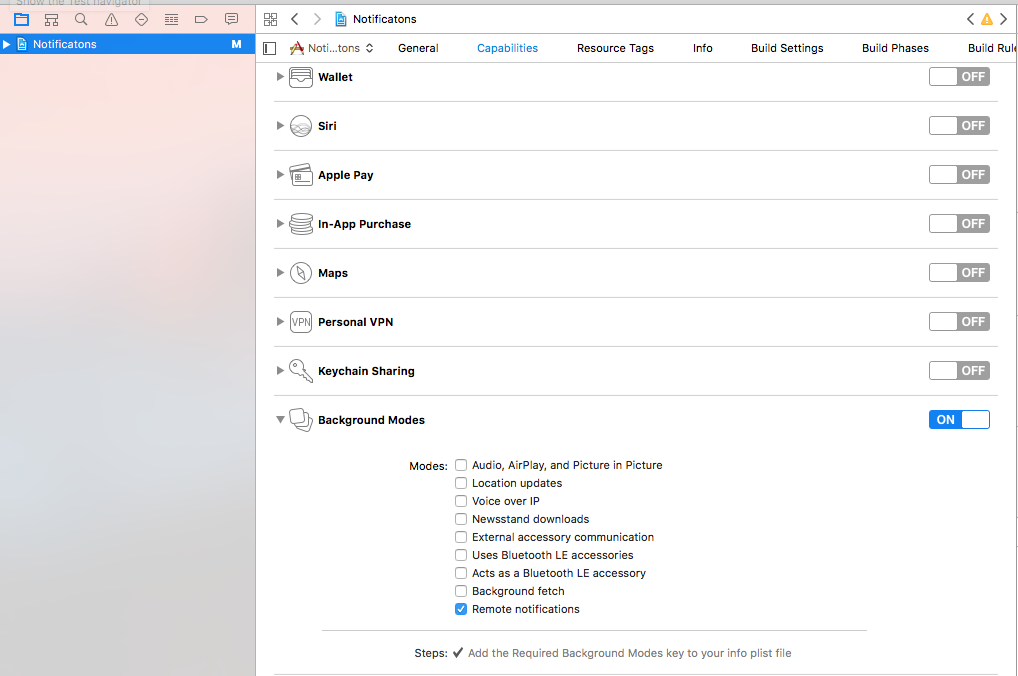
It is required by Gamooga that you enable Background Mode in the Capabilities section of the main app target. After enabling background modes, select Remote Notification as shown in the snapshot.
6.3.2. AppDelegate Changes
a. Registering for push notifications
- In Objective C
- (BOOL)application:(UIApplication *)application didFinishLaunchingWithOptions:(NSDictionary *)launchOptions { TargetActClient *tc = [TargetActClient sharedInstance]; [tc doPushRegistration]; return YES; } - In Swift
func application(_ application: UIApplication, didFinishLaunchingWithOptions launchOptions: [UIApplication.LaunchOptionsKey: Any]?) -> Bool
{
   let target = TargetActClient.sharedInstance() as TargetActClient
   target.doPushRegistration()
   return true
}
b. Sending the push token to Gamooga servers
- In Objective C
-(void)application:(UIApplication *)application didRegisterForRemoteNotificationsWithDeviceToken:(NSData *)deviceToken { TargetActClient *tc = [TargetActClient sharedInstance]; [tc updatePushRegistrationId:deviceToken]; } - In Swift
func application(_ application: UIApplication, didRegisterForRemoteNotificationsWithDeviceToken deviceToken: Data)
{
   let tc = TargetActClient.sharedInstance() as TargetActClient
   tc.updatePushRegistrationId(deviceToken)
}
c. Handling Push Notification
Notifications are delivered while the app is in the foreground, background or not running state. We can handle them in the following delegate methods.
If the remote notification is tapped, the system calls the method of the app delegate. You can handle the notification and its payload as described:
- In Objective C
-(void)application:(UIApplication *)application didReceiveRemoteNotification:(NSDictionary *)userInfo{ NSLog(@"Received: %@",userInfo); } - In Swift
func application(application: UIApplication, didReceiveRemoteNotification userInfo: [NSObject : AnyObject])
{
  print("\(userInfo)")
}
7. Handling In-app Notification Actions
-(void)selectedBanner:(GAAlertBannerType)bannerType parmaters:(NSMutableDictionary *)actionInformation{
    UIAlertController *alert = [UIAlertController alertControllerWithTitle:@"Alert" message:@"Info" preferredStyle:UIAlertControllerStyleAlert];
    UIAlertAction *okAction = [UIAlertAction actionWithTitle:@"OK" style:UIAlertActionStyleDefault handler:^(UIAlertAction * _Nonnull action) {
    }];
     [alert addAction:okAction];
     [self.window.rootViewController presentViewController:alert animated:YES completion:nil];
     if (bannerType == StripInApp) {
     } else if (bannerType == ImageInApp){
     } else if (bannerType == TextInApp){
     } else if (bannerType == TextImageInApp){
     } else if (bannerType == FullImageInApp){
     }
}
8. API
-
Get TargetActClient singleton
a. In Objective C
 #import "TargetActClient/TargetActClient.h"
 TargetActClient *tac = [TargetActClient sharedInstance];
b. In Swift
 import TargetActClient
 let tac = TargetActClient.sharedInstance() as TargetActClient
Use the above lines anywhere in your code to get the singleton of TargetActClient which is required to call Gamooga API.
-
Initialize TargetActClient
a. In Objective C
TargetActClient *tac = [[TargetActClient alloc] init];b. In Swift
let tac = TargetActClient()This initializes the TargetActClient to send events and receive in-app/push notifications. Hence make sure to call it in your Appdelegate’s ‘(BOOL)application:didFinishLaunchingWithOptions:’
- Identify users
-(void)identify:(NSString *)uniqId;When the app is installed a new visitor id is generated and stored in the app. When the user is identified, then the visitor id is changed to user’s visitor id if he is already identified from any other device(in which case all the events pushed until this point are lost) or the current visitor id is retained.
-
Gamooga library can do the required APNs registration for you for receiving push notifications. Call the following method to initiate push registration in the background. Apple recommends you to call this method at all invocations of the app. Hence you can call it in ‘application:didFinishLaunchingWithOptions’ method of your Appdelegate.
a. In Objective C
[tac doPushRegistration];b. In Swift
tac.doPushRegistration()If you are doing APNs registration on your own or using other 3rd party SDKs, you can skip the above step and just pass Gamooga the push registration id using the below API.
-
Once the APNs registration is complete(through the above API call or 3rd party call), iOS calls the delegate method ‘application: didRegisterForRemoteNotificationsWithDeviceToken:’ with the token. Pass it on to us using the following method.
a. In Objective C
[tac updatePushRegistrationId:<token>];b. In Swift
tac.updatePushRegistrationId(<deviceToken>) -
Call the below method to get the push registration id:
a. In Objective C
NSString *pr_id = [tc getPushRegistrationId];b. In Swift
let pr_id = tc.getPushRegistrationId() - Call the below method to push events to Gamooga:
-(void)pushEvent:(NSString *)ev withProperties:(NSDictionary *)props;ev is the name of the event to be pushed and props is the NSDictionary of the key-value pairs associated with the event. Any JSON-able value (string, int, float, boolean, etc) can be added to the map.
All event names and property names can only contain alpha-numeric characters or underscores(these should not contain any spaces). They cannot start with a number or an underscore and should be in lowercase
- Call the below method to push visitor properties to Gamooga:
(void)pushProperty:(NSString *)prop withValue:(id)val;prop is the visitor’s property (email, mobile, etc) and val is any JSON-able value (string, int, float, boolean, etc)
The Property name can only contain alpha-numeric characters or underscores(these should not contain any spaces). It cannot start with a number or an underscore and should be in lowercase.
-
Call the below method to push visitor properties into a list:
a. In Objective C
[tc addPropertyToList:prop withValue:val];b. In Swift
tac.addProperty(toList: prop, withValue: val) -
Call the below method to remove property from visitor properties list:
a. In Objective C
[tc removePropertyFromList:prop withValue:val];b. In Swift
tac.removeProperty(fromList:prop, withValue: val) -
Use the below snippet to get the events stored on Gamooga server:
a. In Objective C
[tc getEvents:@"eventt" events_count:10 timestamp:0 withCompletion:^(NSData* result, NSInteger status) {
   NSString* str = [[NSString alloc] initWithData:result encoding:NSUTF8StringEncoding];
   NSLog(@"result: %@, status: %ld", str, (long)status);
}];
b. In Swift
tac.getEvents("event", events_count: 10, timestamp: 0, withCompletion: {(_ result: Data?, _ status: Int) -> Void in if let aResult = result { print("result: \(aResult), status: \(status)") } var newStr: String? = nil if let aResult = result { newStr = String(data: aResult, encoding: .utf8) } print("newStr: \(newStr ?? "")") }) -
Callback for custom actions. Can be used to render sections on the fly on iOS screens:
a. In Objective C
[tc registerCustomActionCallback:^(NSDictionary* result) {
   //Process result
}];
b. In Swift
 tac.registerCustomActionCallback({ result in
   //Process result
})
Data will be a JSON of the format {“ca_data”: “”, “name”: “”}
9. Rich Push Integration
In order to add images, GIFs, audio and video to enhance the customer-experience of the push notifications sent out to the users, it is required to integrate Gamooga’s Rich Push SDK. Click here to read the documentation for integrating the Rich Push SDK.
With the addition of the Rich Push SDK, events for obtaining receipt of push and opening of the push can also be implemented. Steps to perform the same can be found in the same documentation