1. Include the SDK
You have to add this maven URL ‘http://maven.gamooga.com:8081/artifactory/libs-release’ into project level build.gradle file Include this URL like below:
allprojects {
    repositories {
        jcenter()
        maven {
            // add this line for gamooga repo, the above lines may already be there
            url 'http://maven.gamooga.com:8081/artifactory/libs-release'
        }
    }
}
Also add “com.gamooga.targetact:gamooga-targetact-client:1.8.8.9” as a dependency in app/build.gradle since its required for Gamooga SDK. You will need to add a dependency like below, only if its not already added:
compile 'com.gamooga.targetact:gamooga-targetact-client:1.8.8.2-gcm'
You should also add Google Play Services as a dependency in app/build.gradle since its required for Gamooga SDK. You will need to add a dependency like below, only if it’s not already added:
compile "com.google.android.gms:play-services:+"
2. Update AndroidManifest.xml
2.1. Permissions
The following permissions are required for our SDK. Add them if not already added into your AndroidManifest.xml:
<uses-permission android:name="com.google.android.c2dm.permission.RECEIVE" />
<uses-permission android:name="android.permission.WAKE_LOCK" />
<uses-permission android:name="android.permission.INTERNET" />
<uses-permission android:name="android.permission.ACCESS_NETWORK_STATE" />
2.2. Gamooga configuration
Add your Gamooga Company ID as a metadata into AndroidManifest.xml like below:
<meta-data android:name="GAMOOGA_COMPANY_ID" android:value="<your company id>" />
Please refer to section Get Gamooga Company Id to retrieve the Company Id. Replace the <your company id> with the Company Id.
2.3. GCM Sender Id configuration
Add your GCM Sender Id as a metadata into AndroidManifest.xml like below:
<meta-data android:name="GAMOOGA_GCM_SENDER_ID" android:value="id:<your sender id>" />
Refer to section Get Firebase Server Key and Sender ID to understand how to retrieve the Sender ID from your Firebase project. Replace <your sender id> above with the Sender ID.
2.4. Push configuration
Add the following to your AndroidManifest.xml for Gamooga to handle push notifications:
<receiver
    android:name="com.google.android.gms.gcm.GcmReceiver"
    android:exported="true"
    android:permission="com.google.android.c2dm.permission.SEND" />
    <intent-filter>
        <action android:name="com.google.android.c2dm.intent.RECEIVE" />
        <category android:name="Your_app_id" />
    </intent-filter>
</receiver>
<service
    android:name="com.gamooga.targetact.client.GamoogaGcmListenerService"
    android:exported="false" />
    <intent-filter>
        <action android:name="com.google.android.c2dm.intent.RECEIVE" />
    </intent-filter>
</service>
<service
    android:name="com.gamooga.targetact.client.GamoogaInstanceIDListenerService"
    android:exported="false">
    <intent-filter>
        <action android:name="com.google.android.gms.iid.InstanceID"/>
    </intent-filter>
</service>
<activity
    android:name="com.gamooga.targetact.client.GcmActivityShower"
    android:label="Loading"
    android:exported="true">
</activity>
<service
    android:name="com.gamooga.targetact.client.RegistrationIntentService"
    android:exported="false">
</service>
3. Gamooga API
3.1. Import and initialize
Import TargetActClient like below:
import com.gamooga.targetact.client.TargetActClient
Get the singleton instance anywhere in your code like below:
TargetActClient tac = TargetActClient.getInstance();
Before any other API is called, its necessary to initialize the client like below. The call will make a few calls to our servers, initialize the internal state and make it ready to send events and receive notifications. Hence make sure to call it in OnCreate method of the launcher activity.
Initialize it like below:
-
With activity as the argument if in-app notification functionality is required:
tac.initialize(activity); // if in-app notifications are required -
With application context as the argument (but in-app notification functionality will not be available):
tac.initialize(getApplicationContext()); // if in-app notifications are not required
3.2. Event push
Call the below method to push events to Gamooga:
tac.pushEvent(String eventName, Map eventProps);
eventName is the name of the event to be pushed and eventProps is the Map of the key-value pairs associated with the event. Any JSON-able value (string, int, float, boolean) can be added to the Map. All event names and property names can only contain alpha-numeric characters or underscores. They cannot start with a number or an underscore.
3.3. Visitor property push
Call the below method to push visitor properties to Gamooga:
tac.pushProperty(String propName, Object propVal);
propName is the visitor’s property (name, email, mobile, etc) and propVal is any JSON-able value (string, int, float, boolean). The property name can only contain alpha-numeric characters or underscores. It cannot start with a number or an underscore.
3.4. Visitor identify
Call the below method to identify the visitor with a unique id:
tac.identify(String uniqId);
When the app is installed a new visitor id is generated and stored in the app. When the user is identified, the visitor id is changed to user’s visitor id if he is already identified from any other device or else the current visitor id is retained.
3.5. Visitor property list add
Call the below method to create/append values to a list based visitor property:
tac.addPropertyToList(String propName, String propVal);
propName will be the list that propVal gets appended to.
3.6. Visitor property list remove
Call the below method to remove values from a list based visitor property:
tac.removePropertyFromList(String propName, String propVal);
propName will be the list from which propVal is removed if it exists in the list.
3.7. Push registration
Gamooga can do the GCM registration for you. Call the following method to initiate registration in the background:
tac.doPushRegistration();
Google recommends doing the push registration on every launch. You can also do the push registration from your end but pass on the registration token to Gamooga like below:
tac.savePushRegistrationId("<push token>");
To retrieve the push registration token, you can use the following method:
tac.getPushRegistrationId();
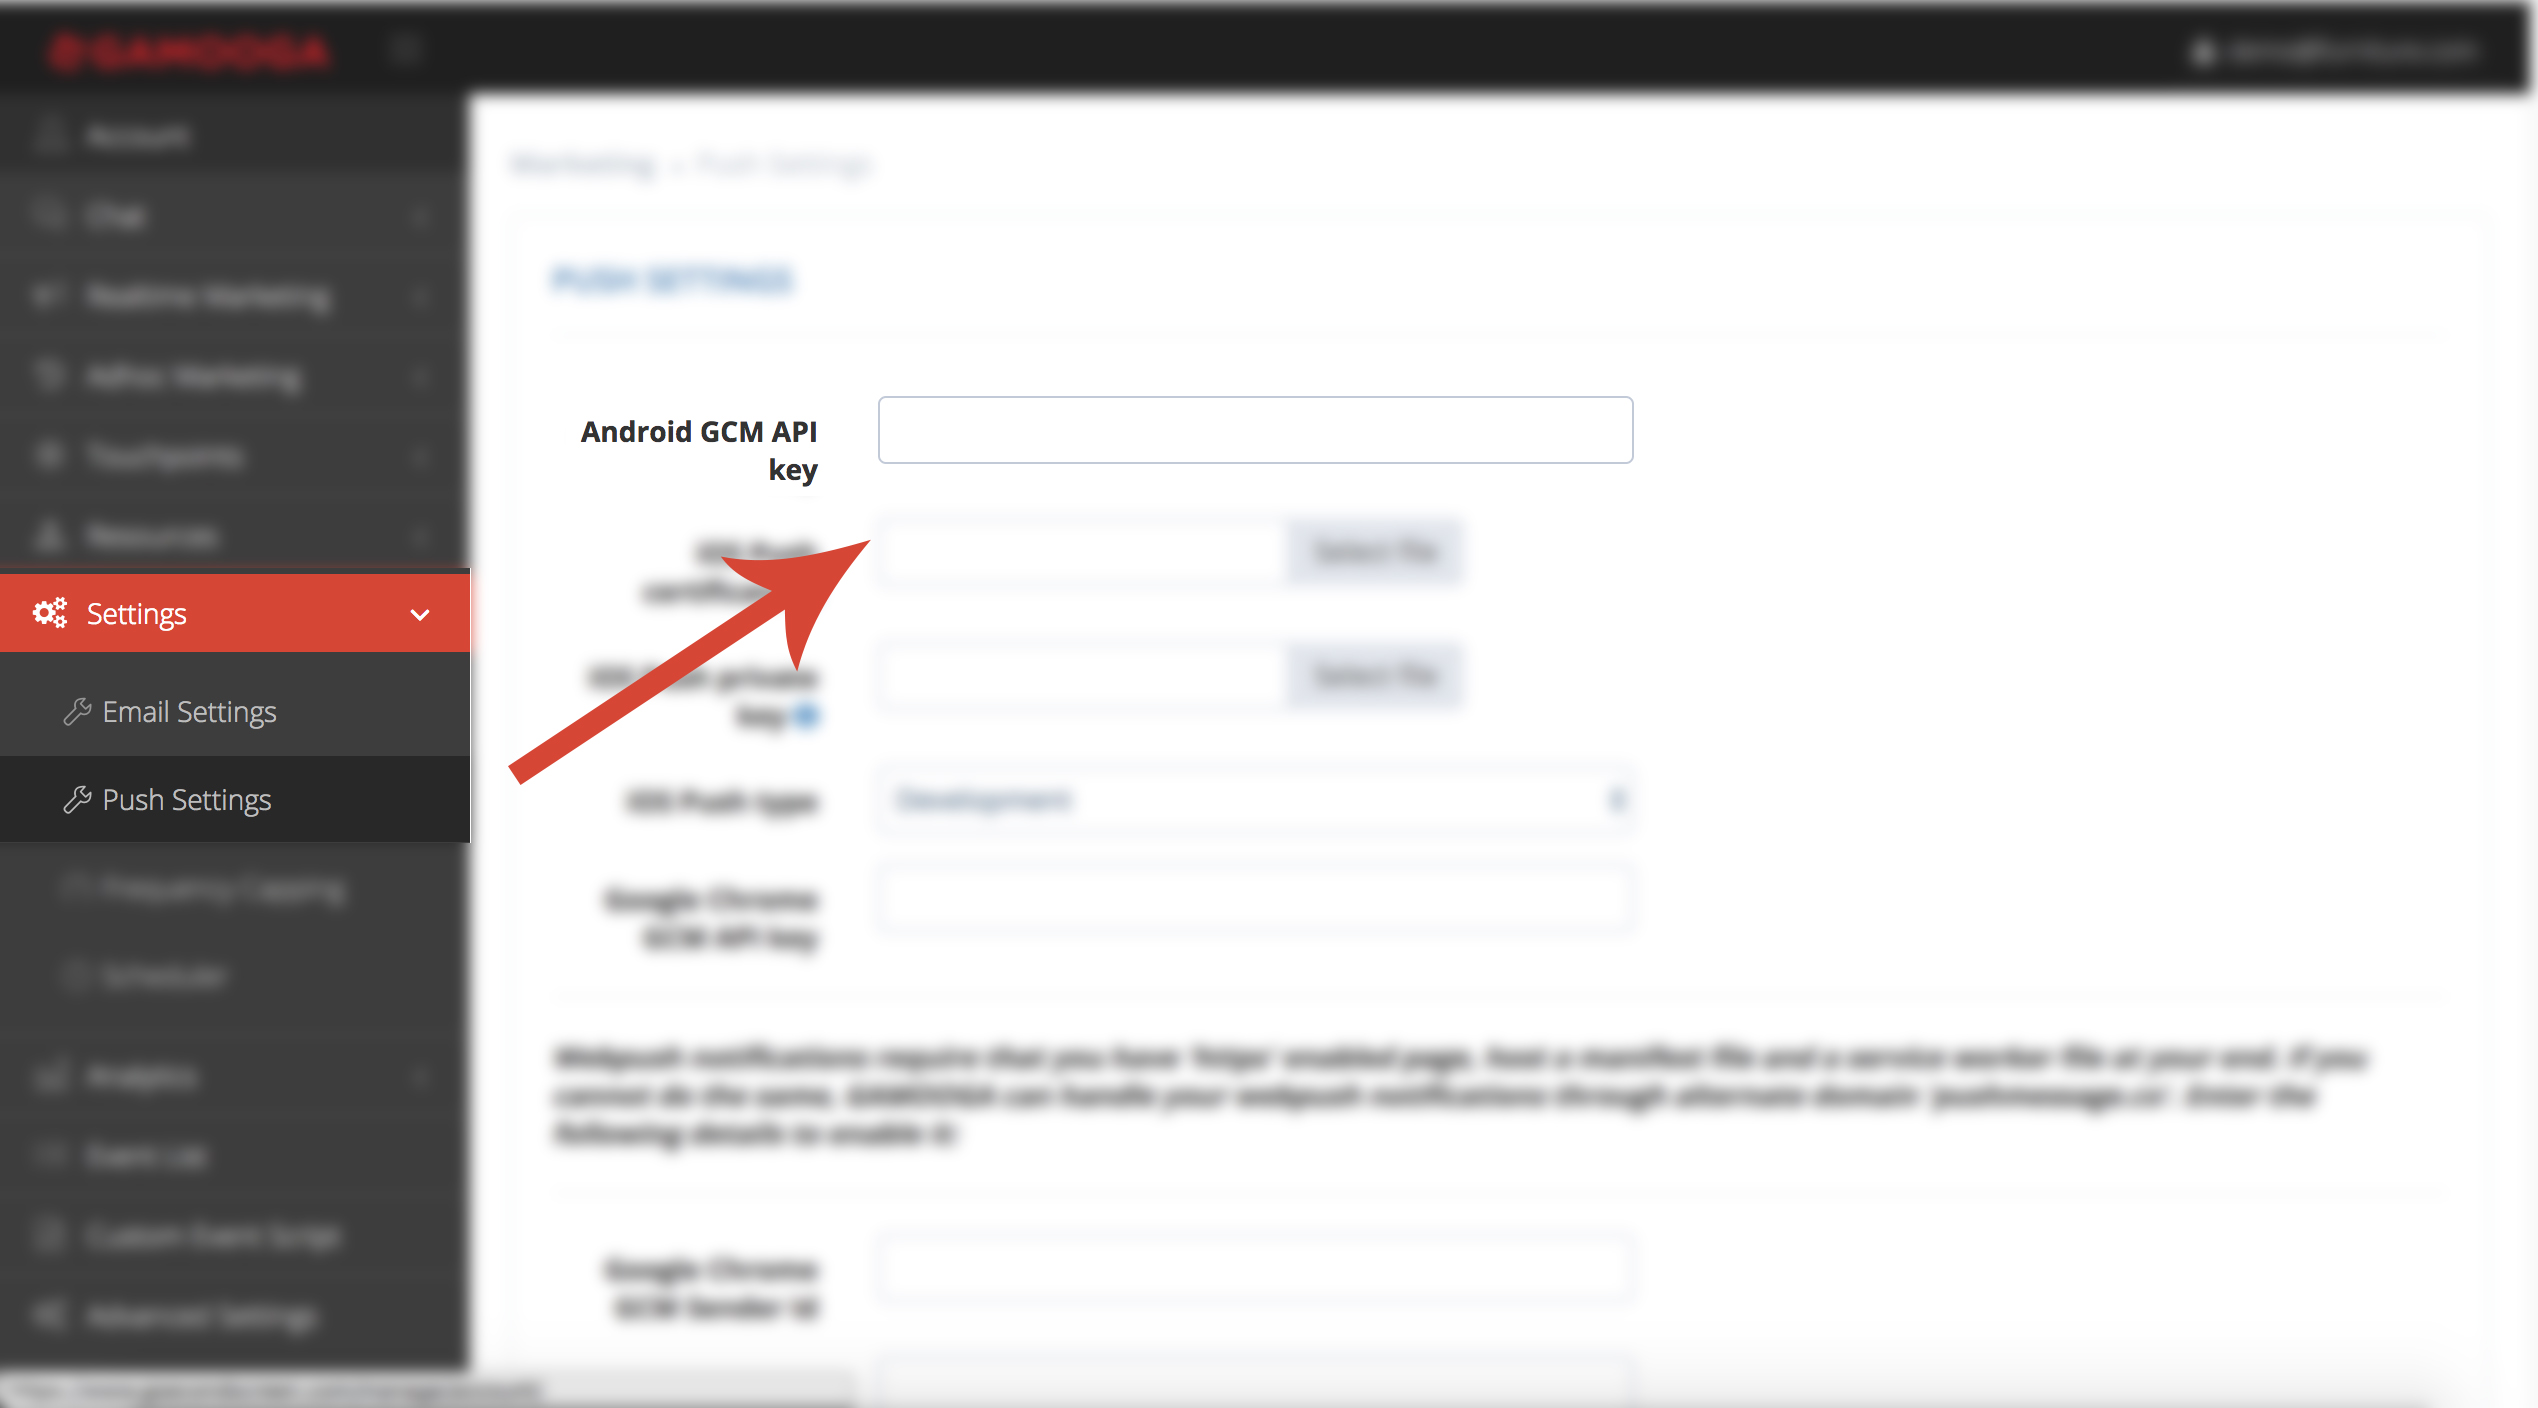
NOTE: To be able to send pushes using Gamooga, you need to configure the Gamooga panel with Firebase Server Key. Refer to section Get Firebase Server Key and Sender Id to understand how to retrieve the Server Key from your Firebase project.
3.8. Custom push receiver
You may be using your own push receiver to handle pushes. To delegate Gamooga pushes to the SDK, you can use the following methods.
To check if it’s a Gamooga push, use the following method:
tac.isGamoogaPush(Bundle bundle);
To let the SDK handle the push, use the following method:
tac.handleGamoogaPush(Context context, Bundle bundle);
3.9. Retrieve events from the server
Gamooga can save events for high-speed retrieval by clients. The following is the API to retrieve such events:
tac.getEvents(ICallback ic, String eventName, int eventCount, long timestamp);
ic is an object implementing ICallback described below. eventName is the name of the event to retrieve the data for. eventCount is the number of events to retrieve. Events that have occurred after timestamp epoch would be returned.
ICallback needs to implemented like below:
class SomeClass implements ICallback {
    @Override
    public void callback(String result, int status) {
        // Process the result here
    }
}
status will be 200 for success, 500 for a record not found, -1 for an unidentified error. It can also be equal to any other HTTP response code. result is a JSON string with the data in the format as below:
{"event_name": [
    {"prop1": "val11", "prop2": "val21", ...},
    {"prop1": "val12", "prop2": "val22", ...},
    ...
]}
3.10. Custom action callback
Gamooga has a touchpoint called custom action. Data can be sent to the device as a result of a campaign which can be custom handled by the app, for example, to render few sections of the app in a personalized manner.
Custom action callback needs to be registered like below:
tac.registerCustomActionCallback(ICallback ic);
Whenever a custom action is received by the app from Gamooga’s back end, callback method of ic is called.
ICallback needs to be implemented like below:
class SomeClass implements ICallback {
    @Override
    public void callback(String result, int status) {
        // Process the result here
    }
}
status will be 200 for success, 500 for a record not found, -1 for an unidentified error. It can also be equal to any other HTTP response code. result is a JSON string with the data in the format as below:
{
    "name": "<custom actio name>",
    "ca_data": "<custom action data sent from campaign side>"
}
3.11. Change session length
Gamooga session lasts for 45 minutes by default. After the last activity if the app is idle for 45 minutes then the session times out.
tac.saveSessionTimeout(int timeout);
timeout is the number of minutes to be set a timeout.
3.12. Cleanup
tac.cleanUp();
In the onDestroy of your App’s launcher activity, you can call the following method to cleanup TargetActClient. Currently, this method is a no-op.
4. Get Firebase Server Key and Sender Id
Follow the below steps to retrieve the sender id:
- Open the Firebase console
- If you haven’t created an API project yet, click Create Project.
- Find your Firebase project and click Project Name.
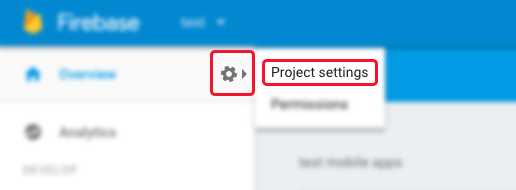
- Click the settings icon and select Project settings menu option.
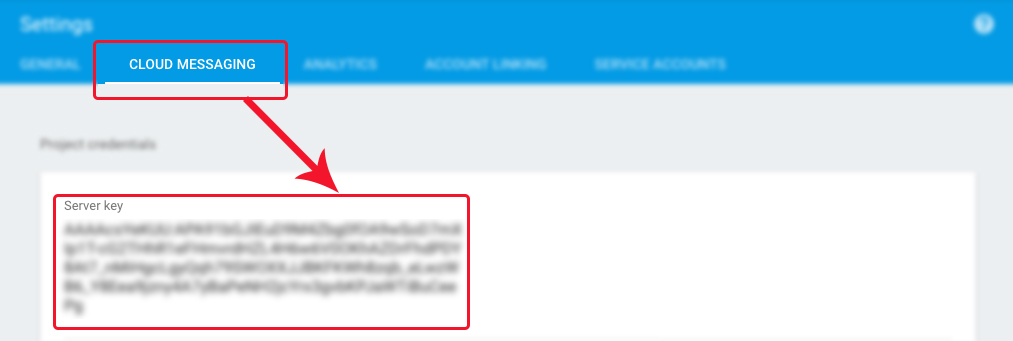
- Select Cloud Messaging tab to reveal the Server Key and Sender Id.
- Use the Sender Id in the AndroidManifest.xml as mentioned in earlier sections.
- Configure the Server Key in Gamooga Admin Panel as shown below.